Quantcast
Channel: Gkhan Tips
Viewing all 290 articles
Browse latest View live

Backup VOS3000 CDR database

$
0
0

Backup VOS3000 CDR database
CDR data maybe very large, about 73G/year/1000cc
the backup is slowly,vos3000 user should depend this by yourself
There are two methods to do this
1)You should stop mbx3000d,vos3000d,mysql services before taking backup

  /bin/tar -jcvf /home/kunshi/vos3000/databackup/vos3000cdr.tar.bz2    e_cdr_* /var/lib/mysql/vos3000/

2)use mysqldump command
The cdr name all begin with “e_cdr_”,then backup the cdr data


The post Backup VOS3000 CDR database appeared first on Gkhan Tips.


Cisco UCS KVM The Virtual Media program will close

$
0
0

Cisco UCS KVM The Virtual Media program will close

I was trying to mount ISO image on Cisco UCS KVM ,when I clicked on Virtual Media tab I got the following Error .ucskvm

I googled it and got solution remove all the java version and install 32 bit java .I tried lower version of java . Java version  7 update 25  (jre-7u25-windows-i586)  worked for me . I was able to map the iso images .I was using UCS version 2.1 (3a).

The post Cisco UCS KVM The Virtual Media program will close appeared first on Gkhan Tips.

Elastix OpenVPN Configuration

$
0
0

Elastix  OpenVPN Configuration

I have taken a scenario of Elastix PBX install on two geographical location  connecting over OpenVpn

and working as a VPN server and client. As we want to use OPENVPN for data and voice connectivity for both offices.

openvpnelastix

All our Internet traffic should go out through DSL Routers and only Voice and data traffic  192.168.1.x  and 192.168.200.x  should go over VPN Tunnel for KU to IN and IN to KU offices.  

IN Office is our Head Office .

LAN IP Range is 192.168.1.x/24

WAN IP is Public Dynamic IP address    (using DynamicDNS for IP update )

Elastix Server 192.168.1.200

Port forward 1194 UDP

enables routing on Elastix server

KU Office is our Branch Office .

LAN IP Range is 192.168.200.x/24

WAN IP is Public Dynamic IP address

Elastix Server 192.168.200.200

enables routing on Elastix server

Port forwarding not needed

Steps taken

1- Configure DynDNS for Dynamic IP address update on IN office .

2- Install EPEL Repository and update

# yum update && yum install epel-release

2- Installed OPEN VPN  and easy-rsa

# yum install openvpn easy-rsa

3-  Generate Keys and Certificates for   IN office and KU office

4- Make server.conf at IN office server /etc/openvpn/server.conf

I have used below configuration on server side

port 1194
proto udp
dev tun
ca /usr/share/easy-rsa/2.0/keys/ca.crt
cert /usr/share/easy-rsa/2.0/keys/ServerA.crt
key /usr/share/easy-rsa/2.0/keys/ServerA.key #
dh /usr/share/easy-rsa/2.0/keys/dh1024.pem
server 10.8.0.0 255.255.255.0
ifconfig-pool-persist ipp.txt
route 192.168.1.0 255.255.255.0
route 192.168.200.0 255.255.255.0
push “route 192.168.1.0 255.255.255.0”
push “route 192.168.200.0 255.255.255.0”
client-config-dir ccd
client-to-client
keepalive 10 120
comp-lzo
persist-key
persist-tun
status openvpn-status.log
verb 6
mute 20
sndbuf 393216
rcvbuf 393216
push “sndbuf 393216”
push “rcvbuf 393216”

5- create a file /etc/openvpn/ipp.txt

kuwait,10.8.0.2

Note :- the name should be same as name of the client certificate .its will assign always same ip to that client .

6- create a directory CCD  mkdir /etc/openvpn/ccd

nano /etc/openvpn/ccd/ServerA

iroute 192.168.1.0 255.255.255.0

nano /etc/openvpn/ccd/Kuwait

iroute 192.168.200.0 255.255.255.0

7 – Configure Client on KU office

Install and configure openvpn on KU office .

You should be able to access ping for KU office Elastix server for IN office Elastix server tun0 interface and vise versa.

8- Make SIP trunk between both PBX using TUNNEL interface IP address. (10.8.0.x)

9- Make incoming and out going  Route Plan for calls incoming and outgoing.

Now you must be able to make and receive call form IN to KU offices and vise versa.

10 – To allow you network PC to access you must enter a route add command on each PC or server which you want to communicate with each other.

KU office PC

route -p add 192.168.1.0 mask 255.255.255.0  192.168.200.200

IN office

route -p add 192.168.200.0 mask 255.255.255.0 192.168.1.200

Note :- Both Offices PC must have route information for Networks they want to reach. Because you have not installed OPEN VPN client on PCs and its not required because we are using Elastix servers as gateway.

I will update soon on this topic. Client side configuration .


The post Elastix OpenVPN Configuration appeared first on Gkhan Tips.

How to check tftp events in Elastix

$
0
0

How to check tftp events in Elastix

you can check tftp events requested by Cisco Phones by the following command .

tail -f   /var/log/messages

this is show you the request and response by served by tftp server on Elastix .


The post How to check tftp events in Elastix appeared first on Gkhan Tips.

CCIE RS LAB config mistake BGP neighbor not coming up

$
0
0

CCIE RS LAB  config mistake BGP neighbor not coming up

While I was configuring BGP neighbors it was not coming up .

What I did mistake

I have given wrong AS number in neighbor command and when I realize I have given the wrong AS number .then I did not use ” no neighbor x.x.x.x   as  xx ”   and   I  issued new command correcting the AS number. every thing was seems ok on “sh run |  se  bgp”  but neighbor was not coming up . and even after “clear ip bgp * ” command .

what was the solution

I just rebooted the  router  neighbor came up .

Comments Requested to clear why it was not coming .


The post CCIE RS LAB config mistake BGP neighbor not coming up appeared first on Gkhan Tips.

How to change VCenter Server 5.5 Appliance IP address CLI

$
0
0

How to change VCenter Server 5.5 Appliance IP address CLI

  • Open a console session of the VCSA 
  • Login as: root
  • Default password is: vmware

Execute the following command 

/opt/vmware/share/vami/vami_config_net

Now you will get the option to change the network setting.

vcenter

Now you can access your server with url  https://server_ip_address:5480

The post How to change VCenter Server 5.5 Appliance IP address CLI appeared first on Gkhan Tips.

How to troubleshoot CallerID issues on a FXO

$
0
0

How to troubleshoot CallerID issues on a FXO

The Digium® X100M FXO module and X400M FXO module are daughter cards that allow Digium® analog cards to terminate analog telephone lines (POTS).

This document is intended to be a brief description of toublehsooting steps that Digium’s customers can take to resolve Caller ID issues on their Asterisk Server.

Requirements

At least one analog line.
A regular analog phone with Caller ID display feature
Fully configured Asterisk server with the latest version of DAHDI and Asterisk

Troubleshooting Steps

A Caller ID issue could be caused by several factors. This section explores the possibility that the issue could be located at the telco or by noise on the lines.
Connect an analog phone to the demarcation point. In telephony, the demarcation point is the point at which the telephone company network ends and connects with the wiring at the customer premises.
Place a call — using another line or mobile phone — from the PSTN to the analog phone connected at the demarcation point and check if the phone displays Caller ID. If the Caller ID information is not being shown by the phone, please contact your telco and ask them how to enable this feature.
Otherwise, please disconnect the phone and plug it to the line that is directly connected or closest to your Asterisk server and repeat the test call.
If the analog phone shows the CallerID on every call, we could potentially be facing a misconfiguration of your Asterisk server. The following section will discuss how Caller ID detection works in Asterisk and the different options that you have avaialble.

In Asterisk, the CallerID detection is done by the chan_dahdi module. Normally its configuration file is located on /etc/asterisk/chan_dahdi.conf  and there are three variables that control how the feature works:
usecallerid: Sets whether to use caller ID, “yes” or “no” are the only available options

cidsignalling: Determine type of caller ID signaling in use. The Caller ID signaling types supported by Asterisk are:

bell: bell202 as used in US (default)
v23: v23 as used in the UK
v23_jp: v23 as used in Japan
dtmf: DTMF as used in Denmark, Sweden and Netherlands
smdi: Use SMDI for caller ID. Requires SMDI to be enabled

cidstart: Determine signals the start of caller ID. The options supported by Asterisk are:

ring: A ring signals the start (default)
polarity: Polarity reversal signals the start
polarity_IN: Polarity reversal signals the start, DTMF dialtone detection in India
dtmf: DTMF Caller ID spill begins only with DTMF, at various times before the ring. This causes Asterisk to constantly listen for DTMF CallerID signals on the specified channels

If cidstart is configured to use dtmf, the energy level on the line may need to be tuned to properly identify the DTMF tones. This tuning is done with the dtmfcidlevel configuration option. The specified value is compared to the average over a packet of audio level of the absolute value of 16 bit signed linear samples. The default is set to 256, but this is completely arbitrary. It must be set high enough to prevent false detections, while low enough to ensure no dtmf spills are missed.

dtmfcidlevel=256

If you are unsure how to set up these variables. Please contact your telco for more information about the type of signal that the use on the Caller ID (cidsignalling)and when their switches send it (cidstart)

And example of the default configuration of Asterisk is:

file: chan_dahdi.conf

[trunkgroups]

[channels]

usecallerid=yes
cidsignalling=bell
cidstart=ring

Note: “…” means that other configuration unrelated to Caller ID could be there. Please take into consideration that chan_dahdi controls more aspects than the Caller ID. Please do not delete the other variables if you are not sure what those do.

P.S. We have seen at least once where a telco disabled Caller ID by attenuating the Caller ID signal. This disables it for Asterisk and DAHDI, but a plain old telephone service (POTS) handset with Caller ID display can still show Caller ID information in this scenario. If you’re sure you have the chan_dahdi.conf settings correct for your location, and you’re still not getting Caller ID, be sure to contact the provider and make sure they actually have Caller ID enabled on the line.

source link :- http://kb.digium.com/articles/Configuration/How-to-troubleshoot-CallerID-issues-on-a-FXO-or-QuadFXO-module

The post How to troubleshoot CallerID issues on a FXO appeared first on Gkhan Tips.

Cisco UCS Networking Best Practices by Brad Hedlund

$
0
0

Cisco UCS Networking Best Practices by Brad Hedlund

This presentation assumes familiarity with basic networking and server VNIC concepts in UCS, and familiarity with virtual port channels.

This version of the presentation (v2.5) focuses primarily on the Ethernet uplinks. SAN uplinks and VMware networking scenarios are briefly discussed but not covered extensively. Those topics and others such as QoS, the Cisco VIC, and vNIC fabric failover may be included in future versions of this presentation.

Part 1 – Cisco UCS Networking Overview

Part 2 – Switch Mode vs. End Host Mode

Part 3 – End Host Mode – Individual Uplinks

Part 4 – Port Channel Uplinks

Part 5 – Virtual Port Channel Uplinks (vPC)

Part 6 – Connecting Cisco UCS to separate networks

Part 7 – Inter Fabric Traffic Examples

Part 8 – Don’t: Connect Cisco UCS to vPC domains without vPC uplinks

Part 9 – Do: Connect Cisco UCS to vPC domains with vPC uplinks

Part 10 – Connecting Cisco UCS without vPC

Source Link:- http://bradhedlund.com/2010/06/22/cisco-ucs-networking-best-practices/


The post Cisco UCS Networking Best Practices by Brad Hedlund appeared first on Gkhan Tips.


Cisco Router Console Connection giving garbage

$
0
0

Cisco Router Console Connection giving garbage

If you are connecting console cable on Cisco Router  and on your terminal window  are giving  garbage or not human readable output
with below Connection setting .

9321-terminal-settings


then check your config register value by “show version” if you can access your router by accessing telnet or ssh.

Change bit per second speed  and try  19200, 38400, 57600 ,115200,1200, 2400, and 4800.

On some routers the console speed has been changed in the configuration register, and a bits-per-second speed of 9600 does not work. However, this situation is not common. Valid speeds (other than 9600bps) include 1200, 2400, and 4800 bps. On some platforms, notably the 3600 Series Routers, 19200, 38400, 57600 and 115200 bps are supported. Try these if you fail to connect with the settings described in this document.

Console Session Not Accepting Key Strokes

This issue can be due to any of these reasons:

  • Difference in baud rate and the bits per second value
  • Bad console cable
  • Scroll lock option is enabled on the keyboard (make sure that the scroll lock key is disabled on the Keyboard)


For more information :-http://www.cisco.com/c/en/us/support/docs/routers/10000-series-routers/50421-config-register-use.html


The post Cisco Router Console Connection giving garbage appeared first on Gkhan Tips.

how to stop error %Error opening tftp://255.255.255.255/ on cisco router

$
0
0

how to stop error  %Error opening tftp://255.255.255.255/   on cisco router

Problem: Service Configuration Error Messages

Occasionally, during bootup of Cisco hardware through Cisco IOS software, error messages similar to these are displayed:

  • %Error opening tftp://255.255.255.255/network-confg (Socket error)
  • %Error opening tftp://255.255.255.255/cisconet.cfg (Socket error)
  • %Error opening tftp://255.255.255.255/3620-confg (Socket error)
  • %Error opening tftp://255.255.255.255/3620.cfg (Socket error)

These error messages are related to the default service configuration option built into Cisco IOS software, which attempts to access the service configuration files from a network Trivial File Transfer Protocol (TFTP) server.

Solution

In order to disable this feature, issue the no service config global command.

Router#config terminal
Enter configuration commands, one per line.  

Router(config)#no service config

Router(config)#exit

Router#copy running-config startup-config

These error messages no longer appear at the next bootup of the router.

source Link :- Click here

The post how to stop error %Error opening tftp://255.255.255.255/ on cisco router appeared first on Gkhan Tips.

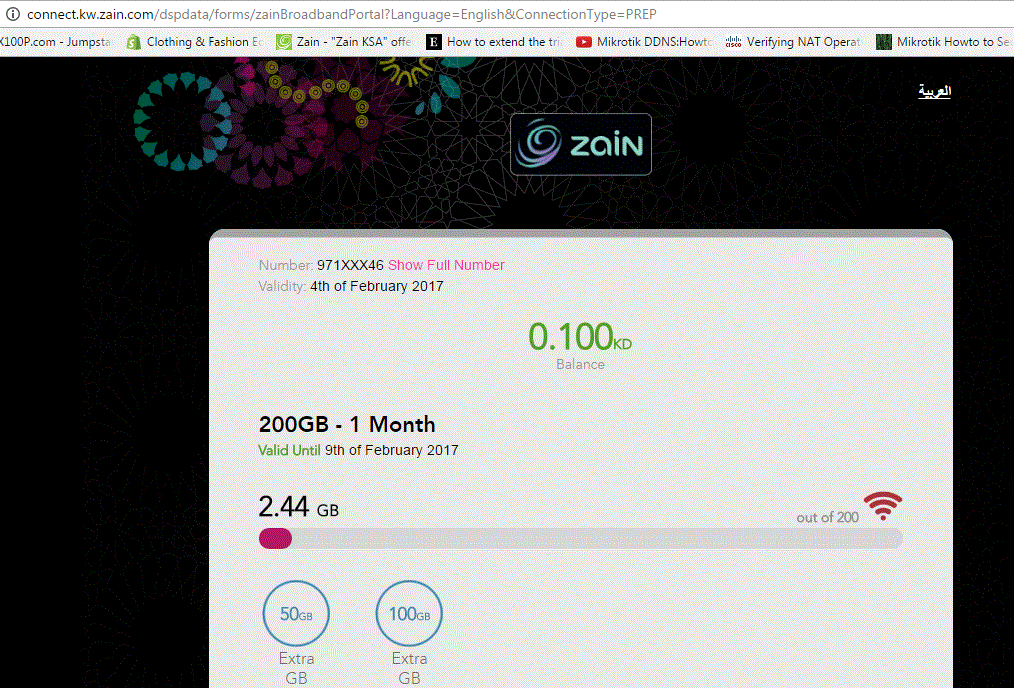
How to check Zain or Viva Prepaid Internet broadband balance by URL Kuwait

How to check software installation and uninstall by event viewer

$
0
0

How to check software installation and uninstall by event viewer

In the application log Event IDs  11707 and 11724  will let you know installation removal of software’s .

Event ID 11707 tells you when a install completes successfully, and also the user who executed the install package.

1- Go to Event Viewer

2- Click on Windows Logs  >  Application


3- On the Right side Actions pane Click on Filter Current Log


4- On the popup window type the event id which you are looking for


Event Type: Information
Event Source: MsiInstaller
Event Category: None
Event ID: 11707
Date: 11/9/2006
Time: 3:21:45 PM
User: DOMAIN\USER
Computer: COMPUTERNAME
Description:
Product: Event Archiver Enterprise — Installation operation completed successfully.


Event ID 11724 tells you when a software package is removed successfully, again logging the user behind the operation.
Event Type: Information
Event Source: MsiInstaller
Event Category: None
Event ID: 11724
Date: 11/12/2007
Time: 7:50:13 PM
User: DOMAIN\USER
Computer: COMPUTERNAME
Description:
Product: Event Archiver Enterprise — Removal completed successfully.


useful link 

The post How to check software installation and uninstall by event viewer appeared first on Gkhan Tips.

How to Configure Cisco Phone 7912G with Elastix

$
0
0

How to Configure Cisco Phone 7912G with Elastix

Cisco Phone 7912G comes with SCCP firmware and you have to convert it to SIP .

The easy way to convert this phone in to SIP .

1- Download the SIP firmware from Cisco or  google it and get it.

SIP Firmware Version: 8.0001
Filename: CP7912080001SIP060412A.tar

2- Extract the file and upload to Elastix   server /tftpboot/    folder

CP7912080001SIP060412A.sbin     and    gkdefault.cfg

3-  Now Edit the File  XMLDefault.cnf.xml

nano /tftpboot/XMLDefault.cnf.xml

insert line

<loadInformation30007  model=”Cisco IP Phone 7912″>CP7912080001SIP060412A</loadInformation30007>

Example file XMLDefault.cnf.xml  More Phone Models

4- If you have configured you Elastix PBX as DHCP server and getting IP address from Elastix

It will now convert SCCP to SIP .

or

Just change the TFTP server 1   ip address to your Elastix server IP address .

or  download TFTP server  http://tftpd32.jounin.net/tftpd32_download.html

Configure it as per your network requirement.


5-  Check your Phone IP address

6- Open your phone in to browser and configure the SIP options .


The post How to Configure Cisco Phone 7912G with Elastix appeared first on Gkhan Tips.

How to configure Cisco Phone 7960 or 7940 with Elastix

$
0
0

How to configure Cisco Phone 7960 or 7940 with Elastix

Cisco Phone 7960 or 7940 comes default with SCCP firmware you need to change the firmware to SIP .

After the SIP firmware update you need to configure these phone to work with Elastix .

Cisco Phone 7960 or 7940 does not support XML configuration file it support cnf  configuration file.

If my Phone MAC address is 0014A9713F98 then my configuration file name should be SIP0014A9713F98.cnf and place it in to Elastix server /tftpboot/ folder


I am giving simple example to configure one Extension . You can change according to your requirement.

proxy1_address: “192.168.1.100”
proxy2_address: “xxx.xxx.xxx.xxx”
proxy3_address: “xxx.xxx.xxx.xxx”
proxy4_address: “xxx.xxx.xxx.xxx”

line1_name: “2000”
line1_shortname: “Reception”
line1_displayname: “ReceptionReception”
line1_authname: “2000”
line1_password: “yourPassword”

line2_name: “”
line2_shortname: “”
line2_displayname: “”
line2_authname: “”
line2_password: “”

proxy_emergency: “”
proxy_emergency_port: “5060”
proxy_backup: “”
proxy_backup_port: “5060”
outbound_proxy: “”
outbound_proxy_port: “5060”

nat_enable: “0”
nat_address: “”
voip_control_port: “5060”
start_media_port: “16348”
end_media_port: “20134”
nat_received_processing: “0”

phone_label: “Reception”
time_zone: CST
logo_url: “http://89concordst.com/asterisk.bmp”

telnet_level: “2”
phone_prompt: “Cisco7940”
phone_password: “password”
enable_vad: “0”
network_media_type: “auto”
user_info: phone

Download Example file  SIP0014A9713F98.cnf       SIPDefault.cnf


The post How to configure Cisco Phone 7960 or 7940 with Elastix appeared first on Gkhan Tips.

How to configure Cisco Phone 7911 with Elastix

$
0
0

How to configure Cisco Phone 7911 with Elastix

Cisco Phone 7911 looks for  term06.default.loads  file to upgrade in to SIP firmware.

Download the SIP firmware from cisco or google it and get the firmware files

Configure your TFTP server and upgrade SIP firmware.

For SIP configuration this phone support XML configuration file . SEPMACADD.cnf.xml

Change the configuration file according to your requirement.


<device xsi:type="axl:XIPPhone" ctiid="1566023366"> 
 <deviceProtocol>SIP</deviceProtocol>   
 <sshUserId>cisco</sshUserId> 
 <sshPassword>cisco</sshPassword> 
 <devicePool> 
      <dateTimeSetting> 
         <dateTemplate>D-M-YA</dateTemplate> 
         <timeZone>Saudi Arabia Standard Time</timeZone> 
      </dateTimeSetting> 
      <callManagerGroup> 
         <members> 
            <member priority="0"> 
               <callManager> 
                  <ports> 
                     <ethernetPhonePort>2000</ethernetPhonePort> 
                     <sipPort>5060</sipPort> 
                     <securedSipPort>5061</securedSipPort> 
                  </ports> 
                  <processNodeName>192.168.1.1</processNodeName>      (your elastix )
               </callManager> 
            </member> 
         </members> 
      </callManagerGroup> 
   </devicePool> 
 <sipProfile> 
      <sipProxies> 
         <backupProxy></backupProxy> 
         <backupProxyPort></backupProxyPort> 
         <emergencyProxy></emergencyProxy> 
         <emergencyProxyPort></emergencyProxyPort> 
         <outboundProxy></outboundProxy> 
         <outboundProxyPort></outboundProxyPort> 
         <registerWithProxy>true</registerWithProxy> 
     </sipProxies>  
     <sipCallFeatures> 
         <cnfJoinEnabled>true</cnfJoinEnabled> 
         <callForwardURI>x--serviceuri-cfwdall</callForwardURI> 
         <callPickupURI>x-cisco-serviceuri-pickup</callPickupURI> 
         <callPickupListURI>x-cisco-serviceuri-opickup</callPickupListURI> 
         <callPickupGroupURI>x-cisco-serviceuri-gpickup</callPickupGroupURI> 
         <meetMeServiceURI>x-cisco-serviceuri-meetme</meetMeServiceURI> 
         <abbreviatedDialURI>x-cisco-serviceuri-abbrdial</abbreviatedDialURI> 
         <rfc2543Hold>false</rfc2543Hold> 
         <callHoldRingback>2</callHoldRingback> 
         <localCfwdEnable>true</localCfwdEnable> 
         <semiAttendedTransfer>true</semiAttendedTransfer> 
         <anonymousCallBlock>2</anonymousCallBlock> 
         <callerIdBlocking>2</callerIdBlocking> 
         <dndControl>0</dndControl> 
         <remoteCcEnable>true</remoteCcEnable> 
     </sipCallFeatures> 
     <sipStack> 
         <sipInviteRetx>6</sipInviteRetx> 
         <sipRetx>10</sipRetx> 
         <timerInviteExpires>180</timerInviteExpires> 
         <timerRegisterExpires>3600</timerRegisterExpires> 
         <timerRegisterDelta>5</timerRegisterDelta> 
         <timerKeepAliveExpires>120</timerKeepAliveExpires> 
         <timerSubscribeExpires>120</timerSubscribeExpires> 
         <timerSubscribeDelta>5</timerSubscribeDelta> 
         <timerT1>500</timerT1> 
         <timerT2>4000</timerT2> 
         <maxRedirects>70</maxRedirects> 
         <remotePartyID>false</remotePartyID> 
         <userInfo>None</userInfo> 
     </sipStack> 
     <autoAnswerTimer>1</autoAnswerTimer> 
      <autoAnswerAltBehavior>false</autoAnswerAltBehavior> 
      <autoAnswerOverride>true</autoAnswerOverride> 
      <transferOnhookEnabled>false</transferOnhookEnabled> 
      <enableVad>false</enableVad> 
       <dtmfAvtPayload>101</dtmfAvtPayload> 
      <dtmfDbLevel>3</dtmfDbLevel> 
      <dtmfOutofBand>avt</dtmfOutofBand> 
      <alwaysUsePrimeLine>false</alwaysUsePrimeLine> 
      <alwaysUsePrimeLineVoiceMail>false</alwaysUsePrimeLineVoiceMail> 
      <kpml>3</kpml> 
      <phoneLabel>2001</phoneLabel> 
      <stutterMsgWaiting>1</stutterMsgWaiting> 
      <callStats>false</callStats> 
      <silentPeriodBetweenCallWaitingBursts>10</silentPeriodBetweenCallWaitingBursts> 
      <disableLocalSpeedDialConfig>false</disableLocalSpeedDialConfig> 
      <startMediaPort>16384</startMediaPort> 
      <stopMediaPort>32766</stopMediaPort> 
      <sipLines> 
         <line button="1"> 
            <featureID>9</featureID> 
            <featureLabel>Gkhan</featureLabel> 
            <proxy>USECALLMANAGER</proxy> 
            <port>5060</port> 
            <name>2001</name>  
            <displayName>Gkhan</displayName> 
            <autoAnswer> 
               <autoAnswerEnabled>2</autoAnswerEnabled> 
           </autoAnswer> 
           <callWaiting>3</callWaiting> 
           <authName>2001</authName> 
            <authPassword>P@ssw0rd</authPassword> 
            <sharedLine>false</sharedLine> 
            <messageWaitingLampPolicy>1</messageWaitingLampPolicy> 
            <messagesNumber>*98</messagesNumber> 
            <ringSettingIdle>4</ringSettingIdle> 
            <ringSettingActive>5</ringSettingActive> 
            <contact>2001</contact> 
            <forwardCallInfoDisplay> 
               <callerName>true</callerName> 
               <callerNumber>false</callerNumber> 
               <redirectedNumber>false</redirectedNumber> 
               <dialedNumber>true</dialedNumber> 
            </forwardCallInfoDisplay> 
        </line> 
        <line button="2"> 
            <featureID>21</featureID> 
            <featureLabel>speed dial name goes here</featureLabel> 
            <speedDialNumber>speed dial actual number goes in here</speedDialNumber> 
         </line> 
     </sipLines> 
     <voipControlPort>5060</voipControlPort> 
      <dscpForAudio>184</dscpForAudio> 
      <ringSettingBusyStationPolicy>0</ringSettingBusyStationPolicy> 
      <dialTemplate>dialplan.xml</dialTemplate> 
  </sipProfile> 
  <commonProfile> 
      <phonePassword></phonePassword> 
      <backgroundImageAccess>true</backgroundImageAccess> 
      <callLogBlfEnabled>2</callLogBlfEnabled> 
  </commonProfile> 
  <loadInformation>SIP11.9-2-1S</loadInformation> 
  <vendorConfig> 
  	  <sshAccess>0</sshAccess>
	  <sshPort>22</sshPort>
      <disableSpeaker>false</disableSpeaker> 
      <disableSpeakerAndHeadset>false</disableSpeakerAndHeadset> 
      <pcPort>0</pcPort> 
      <settingsAccess>1</settingsAccess> 
      <garp>0</garp> 
      <voiceVlanAccess>0</voiceVlanAccess> 
      <videoCapability>0</videoCapability> 
      <autoSelectLineEnable>0</autoSelectLineEnable> 
      <webAccess>1</webAccess> 
      <daysDisplayNotActive>1,2,3,4,5,6,7</daysDisplayNotActive> 
      <displayOnTime>00:00</displayOnTime> 
      <displayOnDuration>00:00</displayOnDuration> 
      <displayIdleTimeout>00:00</displayIdleTimeout> 
      <spanToPCPort>1</spanToPCPort> 
      <loggingDisplay>1</loggingDisplay> 
      <loadServer></loadServer> 
  </vendorConfig> 
  <versionStamp>1143565489-a3cbf294-7526-4c29-8791-c4fce4ce4c37</versionStamp> 
  <networkLocale>U.A.E</networkLocale> 
   <deviceSecurityMode>1</deviceSecurityMode> 
   <authenticationURL>http://192.168.1.1/cisco/services/authenticate.php</authenticationURL> 
   <directoryURL>http://192.168.1.1/xmlservices/LocalDirectory.php</directoryURL> 
   <idleURL>http://192.168.1.1/xmlservices/index.php</idleURL> 
   <informationURL>http://192.168.1.1/GetTelecasterHelpText.jsp</informationURL> 
   <messagesURL></messagesURL> 
   <proxyServerURL>proxy:3128</proxyServerURL> 
   <servicesURL>http://192.168.1.1/xmlservices/index.php</servicesURL> 
   <dscpForSCCPPhoneConfig>96</dscpForSCCPPhoneConfig> 
   <dscpForSCCPPhoneServices>0</dscpForSCCPPhoneServices> 
   <dscpForCm2Dvce>96</dscpForCm2Dvce> 
   <transportLayerProtocol>2</transportLayerProtocol> 
   <capfAuthMode>0</capfAuthMode> 
   <capfList> 
      <capf> 
         <phonePort>3804</phonePort> 
      </capf> 
   </capfList> 
   <certHash></certHash> 
   <encrConfig>false</encrConfig> 
 </device>

Download Example file click  here

The post How to configure Cisco Phone 7911 with Elastix appeared first on Gkhan Tips.


Elastix IVR Recording PCM Encoded, 16 Bits, at 8000Hz

$
0
0

Elastix IVR Recording PCM Encoded, 16 Bits, at 8000Hz

You can record your IVR prompts by two ways  one is by your Telephone Extension and  another is with Sound Recorder software.

1- Go to Elastix PBX setting > Systems Recordings

Give your Extension no  an press Go.

Now go to your Extension and press *99 and record .


2-  Download a Software Dictation Buddy

http://www.libertyrecording.com/TB_main_Recorder.htm

Install the Software

Click on Properties

Click on Recording  Under Sound Quality  Click on Change to Change the format  Elastix compatible

PCM Encoded, 16 Bits, at 8000Hz .

Save your Profile .

Now you can Start Recording and upload to Systems Recordings on Elastix .

Another article i got

Convert WAV audio files for use in Asterisk


http://www.geardownload.com/multimedia/weeny-free-audio-converter-download.html

Choose your files from the AddFiles option and in the output format select the output format as Mp3 and in the quality menu select the 320 kbit/s. this one is good for good quality sound in astrick.


The post Elastix IVR Recording PCM Encoded, 16 Bits, at 8000Hz appeared first on Gkhan Tips.

Windows Server 2012 Start Menu Program List

$
0
0

Windows Server 2012 Start Menu Program List

1- Right Click on Task bar

2- Click New Toolbar dialog box,


3- Browse to the “C:\Program Data\Microsoft\Windows\Start Menu\Programs” folder.

select the folder .

4- Now you can seen on your taskbar program list.

The post Windows Server 2012 Start Menu Program List appeared first on Gkhan Tips.

How to get HBA information of all ESXi Hosts

$
0
0

How to get HBA information of all ESXi Hosts

if you want to get all inventory of HBA cards from all ESXi hosts below are the script will give you below information ,which you require in SAN Zoning and SAN LUN mapping.


#Initialize variables
$VCServer = "your VCenter Server IP Address"
$objHba = @()

#Connect to vCenter Server
Connect-VIServer $VCServer

$clusters = Get-cluster

foreach ($cluster in $clusters) {
    $vmhosts = $cluster | Get-vmhost
    if ($null -ne $vmhosts) {
        foreach ($vmhost in $vmhosts) {
            $vmhostview = $vmhost | Get-View
            foreach ($hba in $vmhostview.config.storagedevice.hostbusadapter) {
                if ($hba.PortWorldWideName) {
                    #Define Custom object
                    $objWwpn = "" | Select Clustername,Hostname,Hba,Wwpn
                    #Add porperties to the newly created object
                    $objWwpn.ClusterName = $cluster.Name
                    $objWwpn.HostName = $vmhost.Name
                    $objWwpn.Hba = $hba.Device
                    $objWwpn.Wwpn = "{0:x}" -f $hba.PortWorldWideName
                    $objHba += $ObjWwpn
                }
            }
        }
    }
}

$objHba | Export-Csv Get-Hba.csv

Disconnect-VIServer -Confirm:$false


Download Script


The post How to get HBA information of all ESXi Hosts appeared first on Gkhan Tips.

How to check VMFS version & block sizes PowerCLI

$
0
0

How to check VMFS version & block sizes PowerCLI

Get-Datastore | Get-View | Select-Object Name,@{N="VMFS version";E={$_.Info.Vmfs.Version}},@{N="BlocksizeMB";E={$_.Info.Vmfs.BlockSizeMB}}


NameVMFS 	      version   BlocksizeMB
----------------    -----------
TempDS                  5.58 	 1
datastore1              5.54  	 1
datastore1 (3)          5.54  	 1
datastore1 (1)          5.54  	 1
datastore1 (4)          5.54  	 1
datastore1 (7)          5.54  	 1
datastore1 (6)          5.54  	 1

The post How to check VMFS version & block sizes PowerCLI appeared first on Gkhan Tips.

List all datastores and disk names

$
0
0

List all datastores and disk names

Get-Datastore |
Where-Object {$_.ExtensionData.Info.GetType().Name -eq "VmfsDatastoreInfo"} |
ForEach-Object {
  if ($_)
  {
    $Datastore = $_
    $Datastore.ExtensionData.Info.Vmfs.Extent |
    Select-Object -Property @{Name="Name";Expression={$Datastore.Name}},
      DiskName
  }
}

PowerCLI script to list all datastores and the disk names of the partitions.

A sample output of this script is:

Name                        DiskName
----                        --------
esxi01_boot                 naa.600a0b80001111550000fb9cf54f414d
esxi02_boot                 naa.600a0b80001111550000850e884f414d
cluster01_gold_001          naa.600a0b80001111550000778bc952494d
cluster01_silver_001        naa.600a0b8000111155000074088c52494d
cluster01_bronze_003        naa.600a0b80001111550000e451a8ed794e
esxi03_boot                 naa.600508b4001078340000e00004c00000
esxi04_boot                 naa.600508b4001078340000e00002c60000
cluster02_gold_001          naa.600508b400055c680000800000dc0000
cluster02_silver_001        naa.600508b4001078340000e00004bb0000
cluster02_bronze_001        naa.600508b4001078340000e00002cb0000


Source link 

The post List all datastores and disk names appeared first on Gkhan Tips.

Viewing all 290 articles
Browse latest View live